Module implementation
Now that you have designed your module, let's get to the fun part: implementation!
In this section, we will illustrate the activities using cloud-based development (Gitpod), but there are very few differences for local development (and we'll point them out as we go).
The following video provides a walkthrough of the instructions in this page.
Prepare your workspace
I assume that you've already gone through the local or cloud-based "installation" and "development" sections, so you have a running Morea template site. To start, make sure that you can build and view the site without error. This means you can run bundle exec jekyll serve and (1) no error messages result, and (2) you can display the site successfully at the URL listed in the "Server address" field. For example:
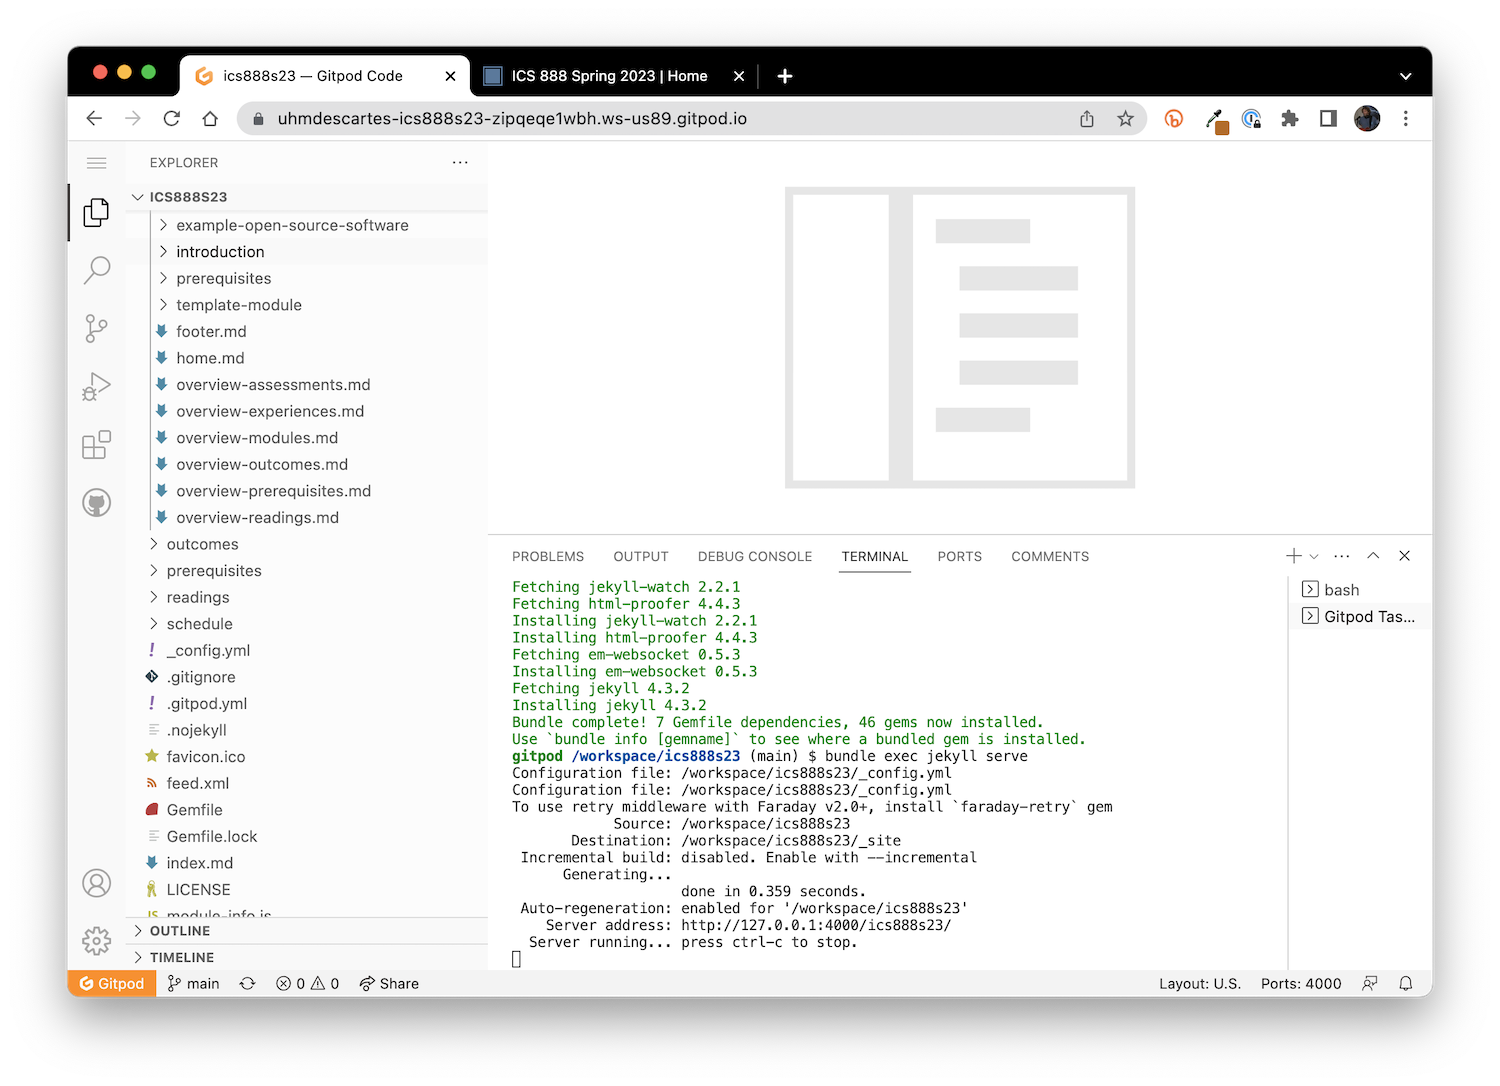
Notice that there are no errors following the invocation of bundle exec jekyll serve.
bundle installGitpod automatically "stops" workspaces after 30 minutes of inactivity. To resume work, you need to "restart" the workspace.
When a stopped Gitpod workspace is restarted, you will need to run bundle install again. If you get an error when you run bundle exec jekyll serve, this might be the reason.
Clicking on the Server address link (http://127.0.0.1:4000/ics888s23) brings up the home page for my site in a new browser tab:
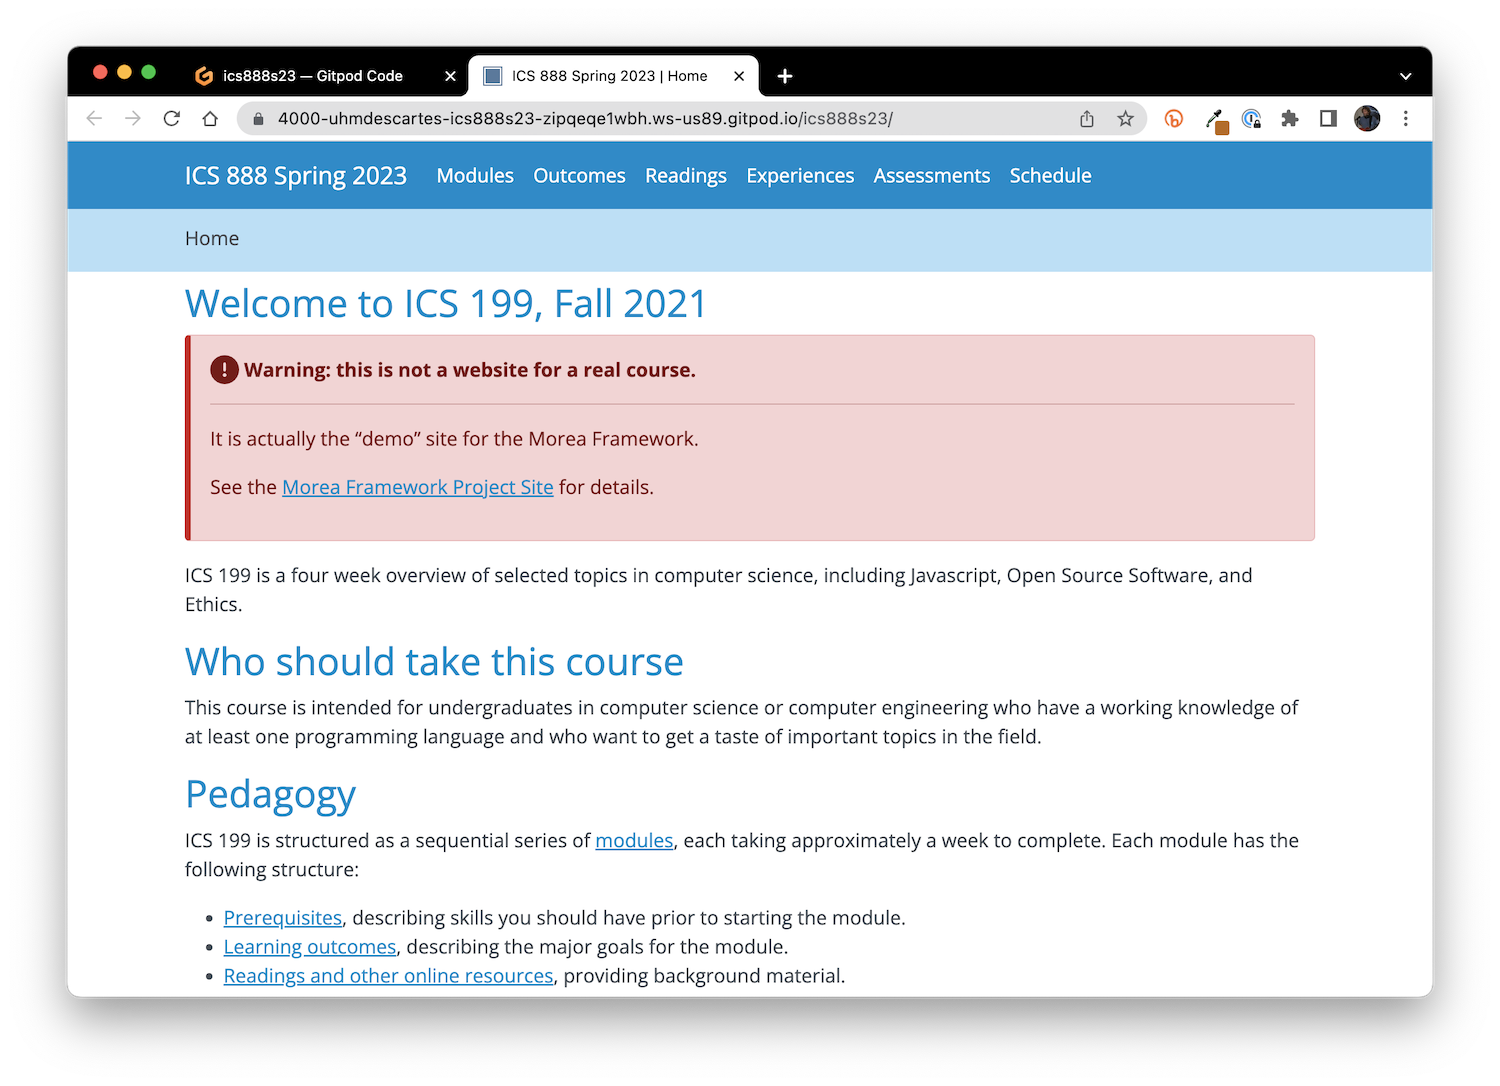
Obviously, the home page needs to be rewritten for this course. You can change the contents of this page by editing the morea/home.md file. But let's focus on the implementation of our new module.
If you are doing local development, this step is basically identical: bring up the repository contents in your editor, run bundle exec jekyll serve in a terminal window, and display the site in a browser.
Make a copy of template-module
The morea directory contains a subdirectory called morea-template that contains a skeleton set of files for defining new modules. Let's use that as the basis for our new module.
First, click your mouse on the "template-module" directory label in the Project window to select it, right click to bring up a menu of operations, and select "Copy".
Second, click your mouse on the "morea" directory label in the Project window to select it, right click to bring up a menu of operations, and select "Paste".
In the case of VS Code, a new directory will be created in the "morea" directory called "template-module copy".
Third, click your mouse on the "template-module copy" directory label in the Project window to select it, right click to bring up a menu of operations, and select "Rename". Rename the directory to "dart".
If you click on the "dart" directory label to reveal its contents, you'll see something like this:
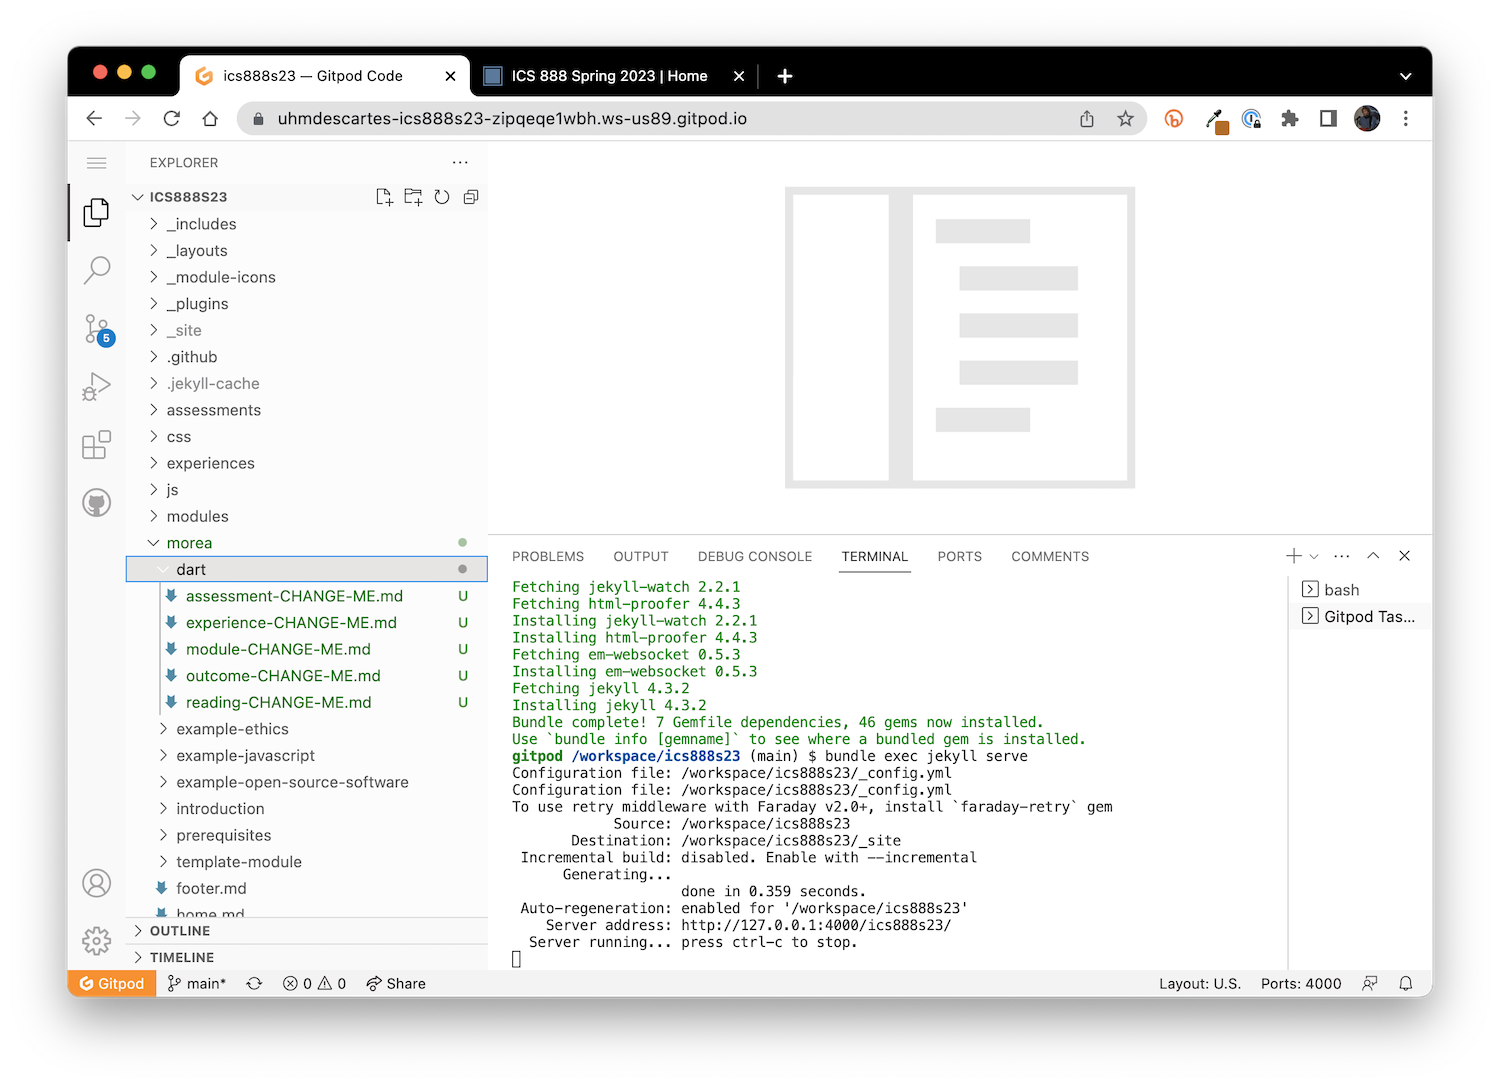
As you can see, the dart directory contains five files corresponding to each of the Morea entity types: "module-CHANGE-ME.md", "outcome-CHANGE-ME.md", "reading-CHANGE-ME.md", "experience-CHANGE-ME.md", and "assessment-CHANGE-ME.md",
As you can see, the dart directory contains the text "CHANGE ME" at various places to help you understand what you need to edit to create a Morea module.
Rename and/or create a file for each module entity
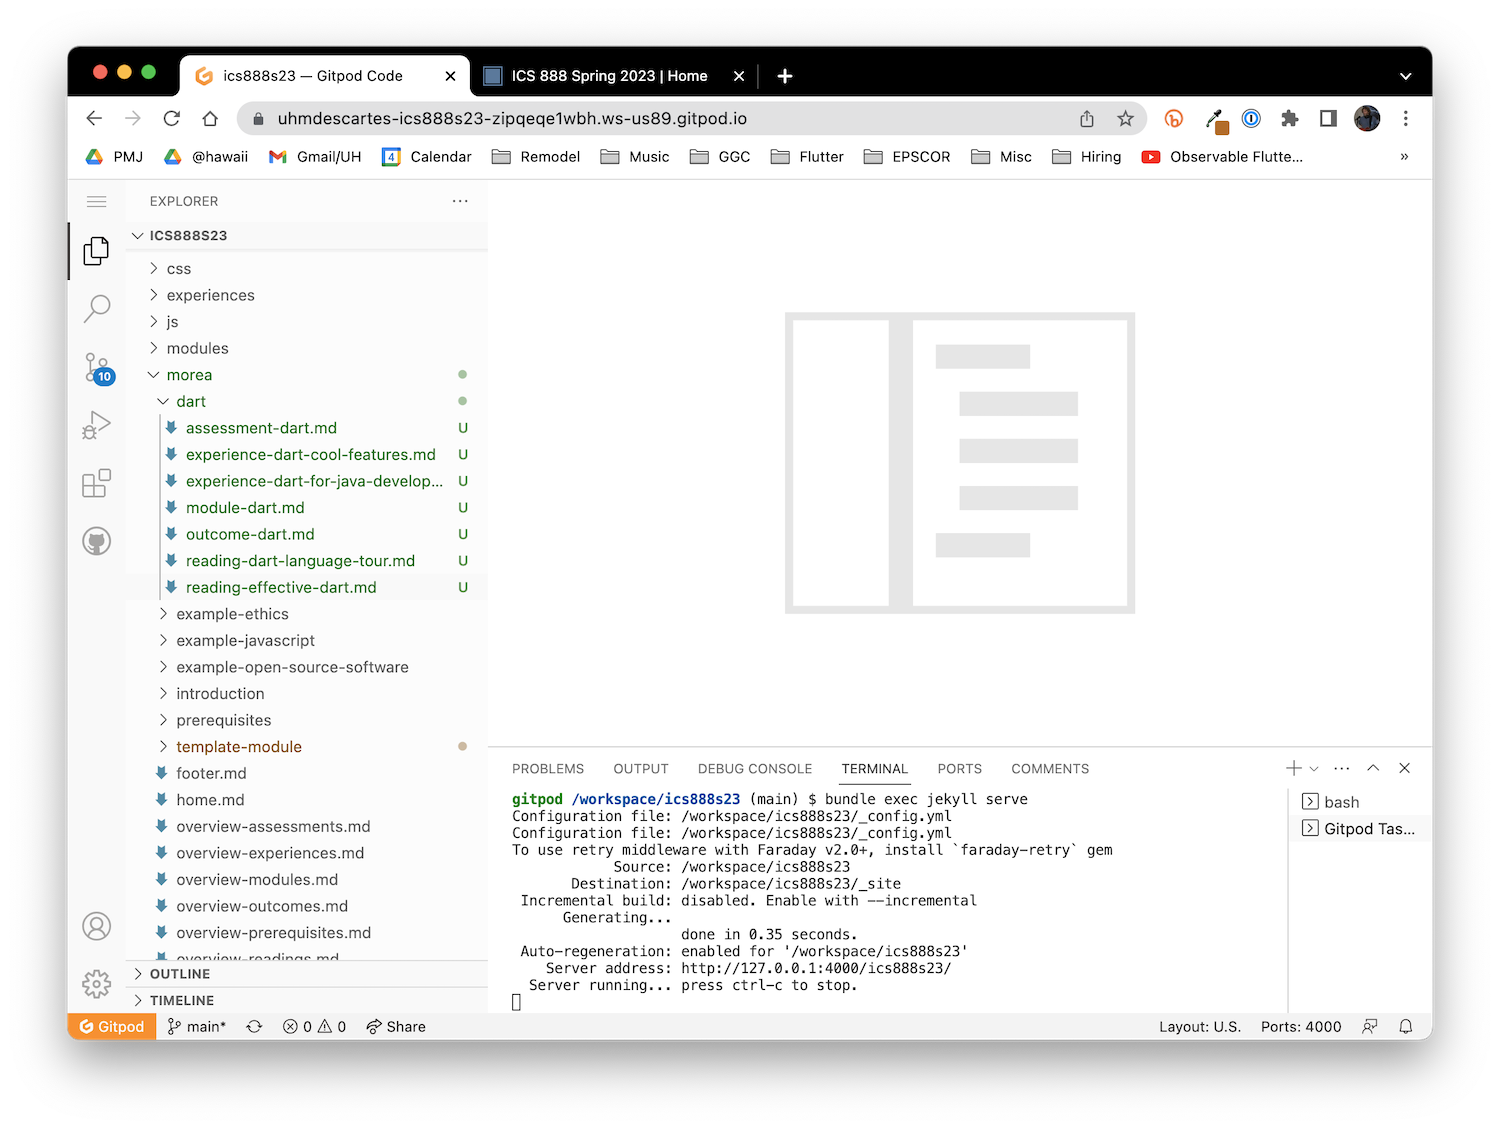
The previous section presented a Dart module design document which specifies that this module should have 1 outcome, 2 readings, and 2 experiences. So, let's create another reading and outcome file, and rename all of the files to better indicate their contents. The dart directory now looks like this:
The astute Morea developer might be wondering why we are able to create copies of Morea directories and files and not get any "duplicate ID" errors.
The answer is that all of files in the template-module directory have their published: field set to false. Because of this, the Morea "compiler" never processes the file and so their IDs are never defined.
As you will see, we will incrementally "publish" the files in the dart directory by setting their published: field to true, but only after their contents have been edited and ready for publication.
Define the Dart module
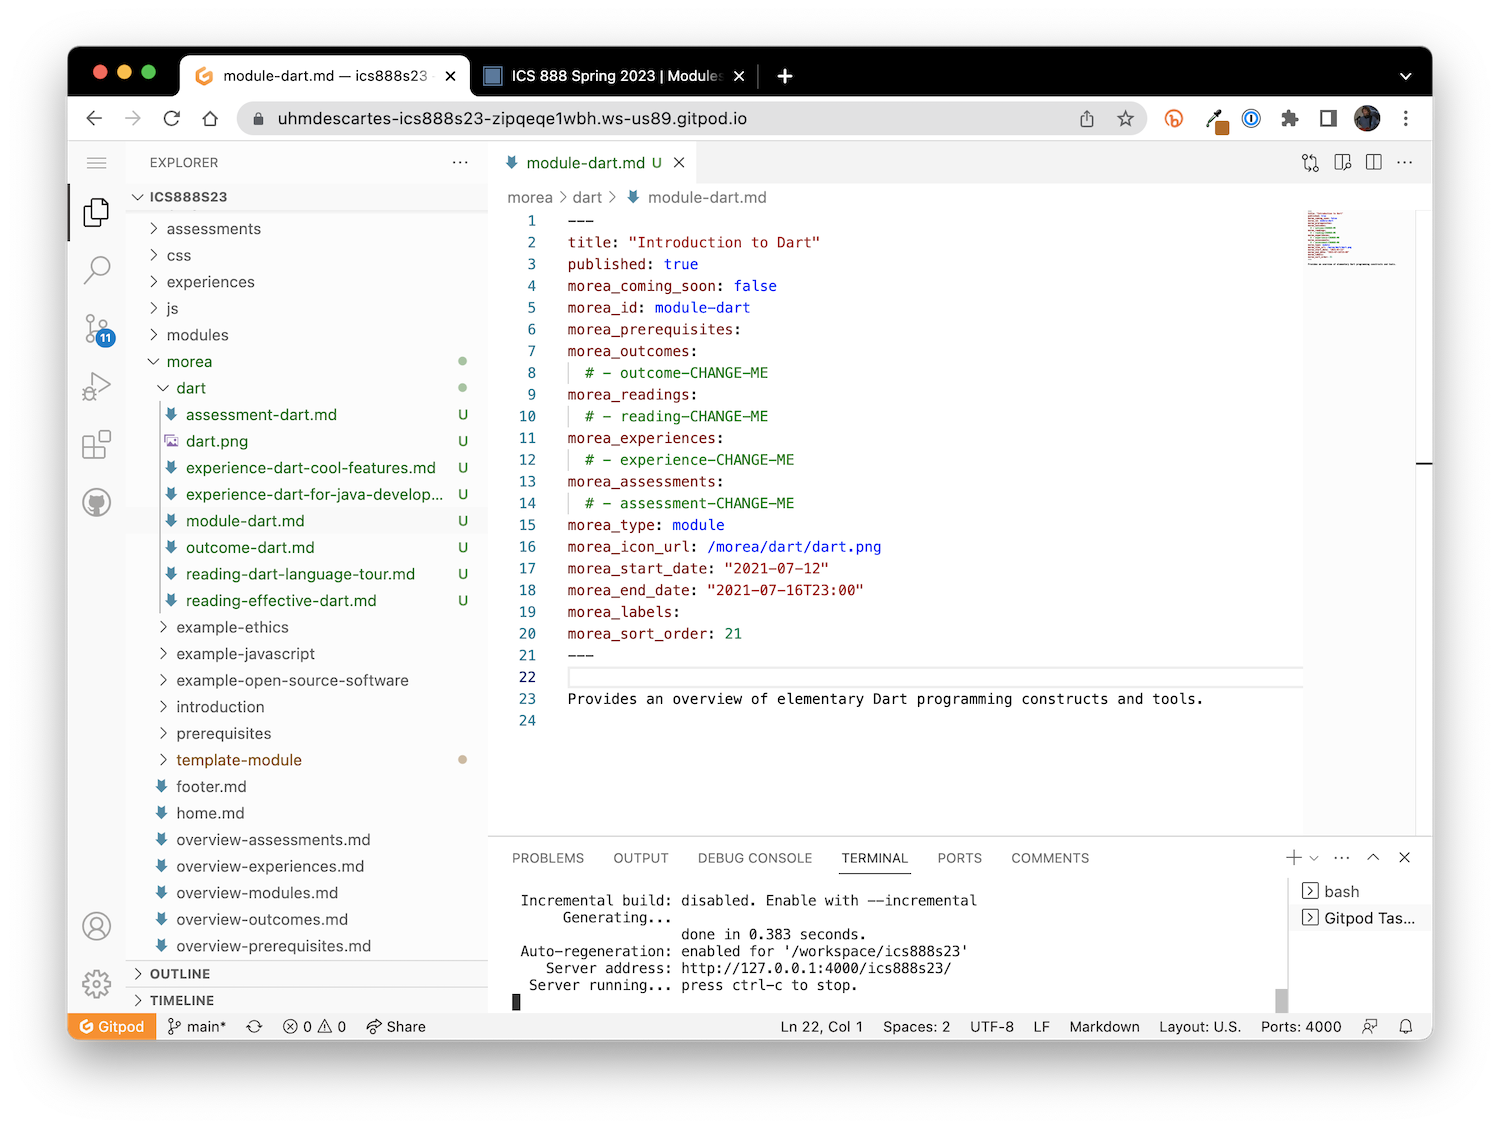
Let's now edit the contents of the module-dart.md file. It currently looks like this:
---
title: "CHANGE ME"
published: false
morea_coming_soon: false
morea_id: module-CHANGE-ME
morea_prerequisites:
morea_outcomes:
  # - outcome-CHANGE-ME
morea_readings:
  # - reading-CHANGE-ME
morea_experiences:
  # - experience-CHANGE-ME
morea_assessments:
  # - assessment-CHANGE-ME
morea_type: module
morea_icon_url: /morea/CHANGE-ME/CHANGE-ME.png
morea_start_date: "2021-07-12"
morea_end_date: "2021-07-16T23:00"
morea_labels:
morea_sort_order: 21
---

CHANGE ME
As you can see, there are several occurrences of "CHANGE ME". Let's start by doing just the minimum to get the module into a publishable form.
- Change
title:to "Introduction to Dart" - Change
published:to "true" - Change
morea_id:to "module-dart". - Change
morea_icon_url:to point to a Dart icon. I decided to download logo_dart_1080px_clr.png from the Dart Logomark Assets Folder, and put it in the dart module folder. I renamed it to dart.png. - Change the body of the file to a one sentence overview of the module. I chose "Provides an overview of elementary Dart programming constructs and tools."
When you've finished with this, there will be a new file called dart.png in the folder, and the module-dart.md file will be updated. For example:
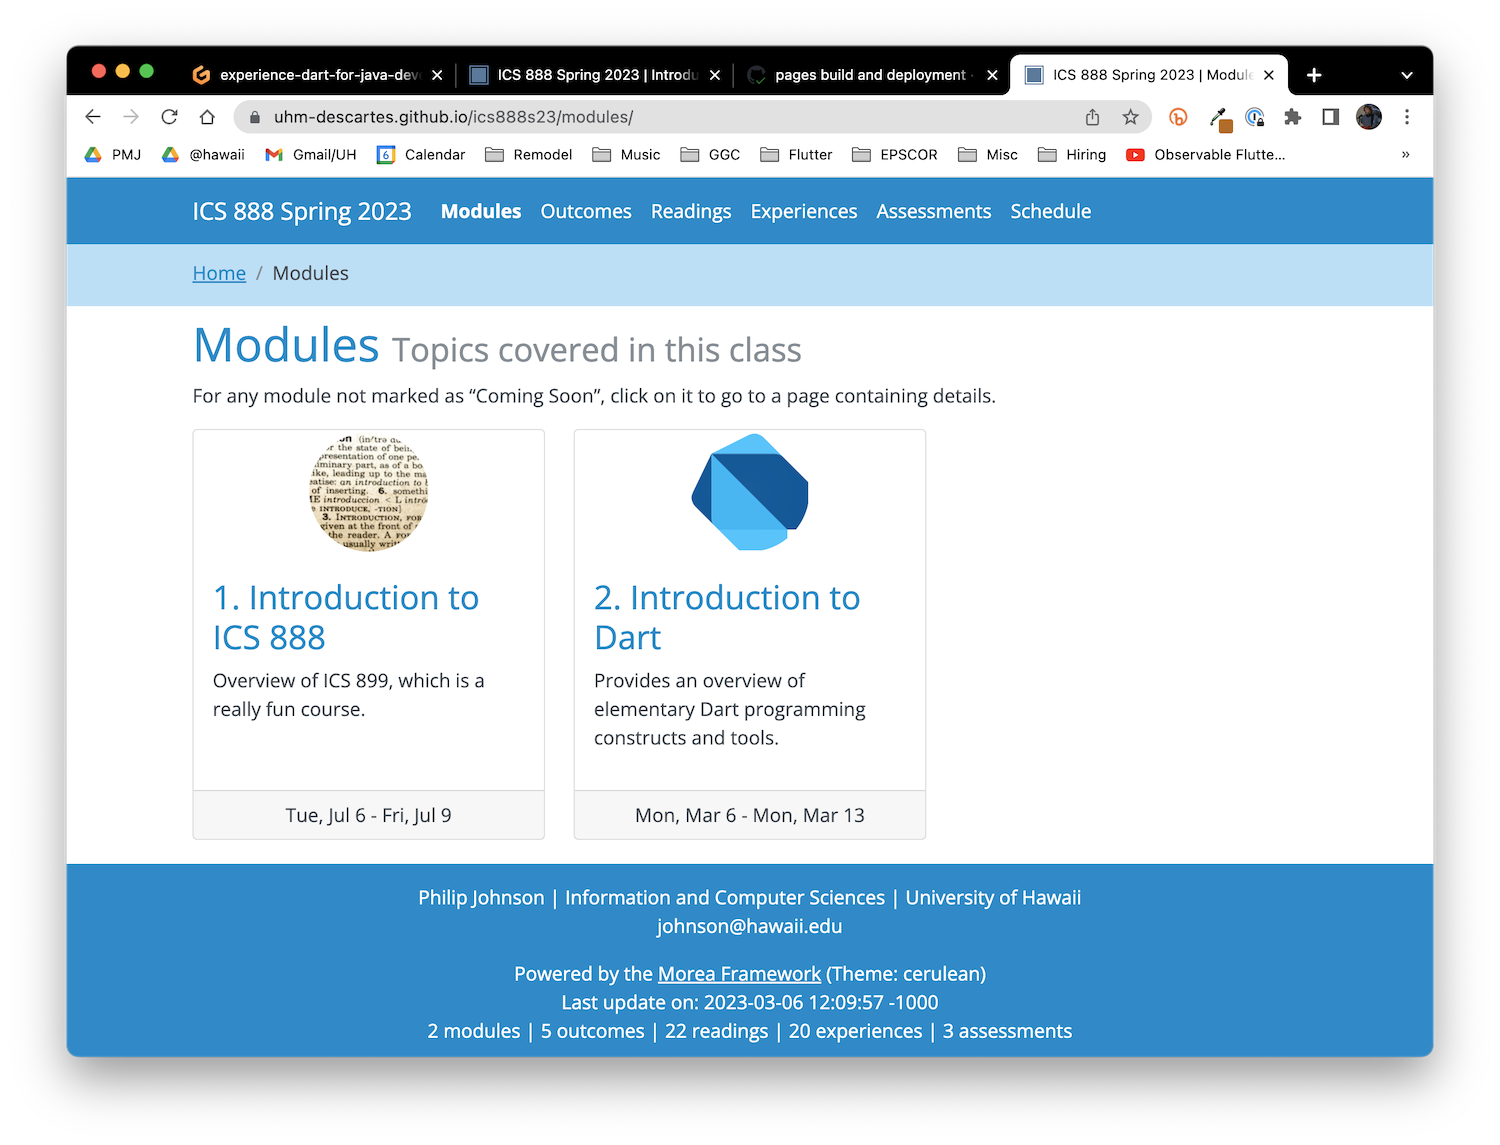
Now, in the Terminal window, type control-c , control-p, return to restart Jekyll, and go to the modules page. You should now see the Dart module:
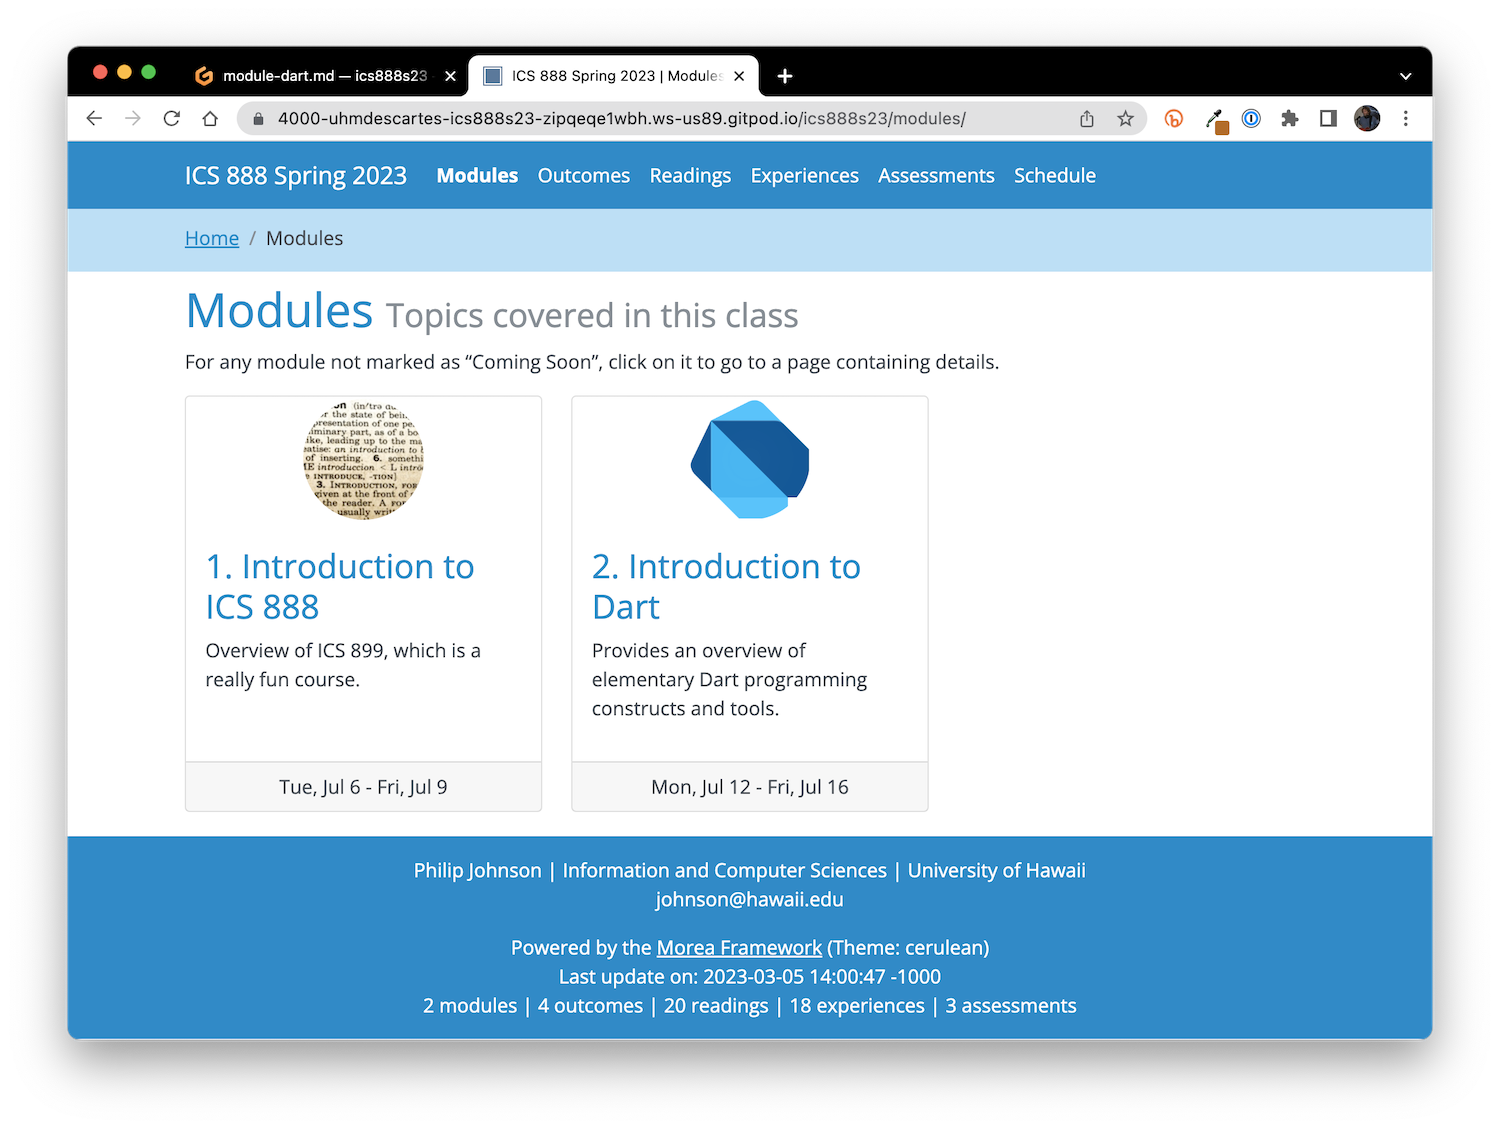
Clicking into the actual Dart module page is currently not very exciting:
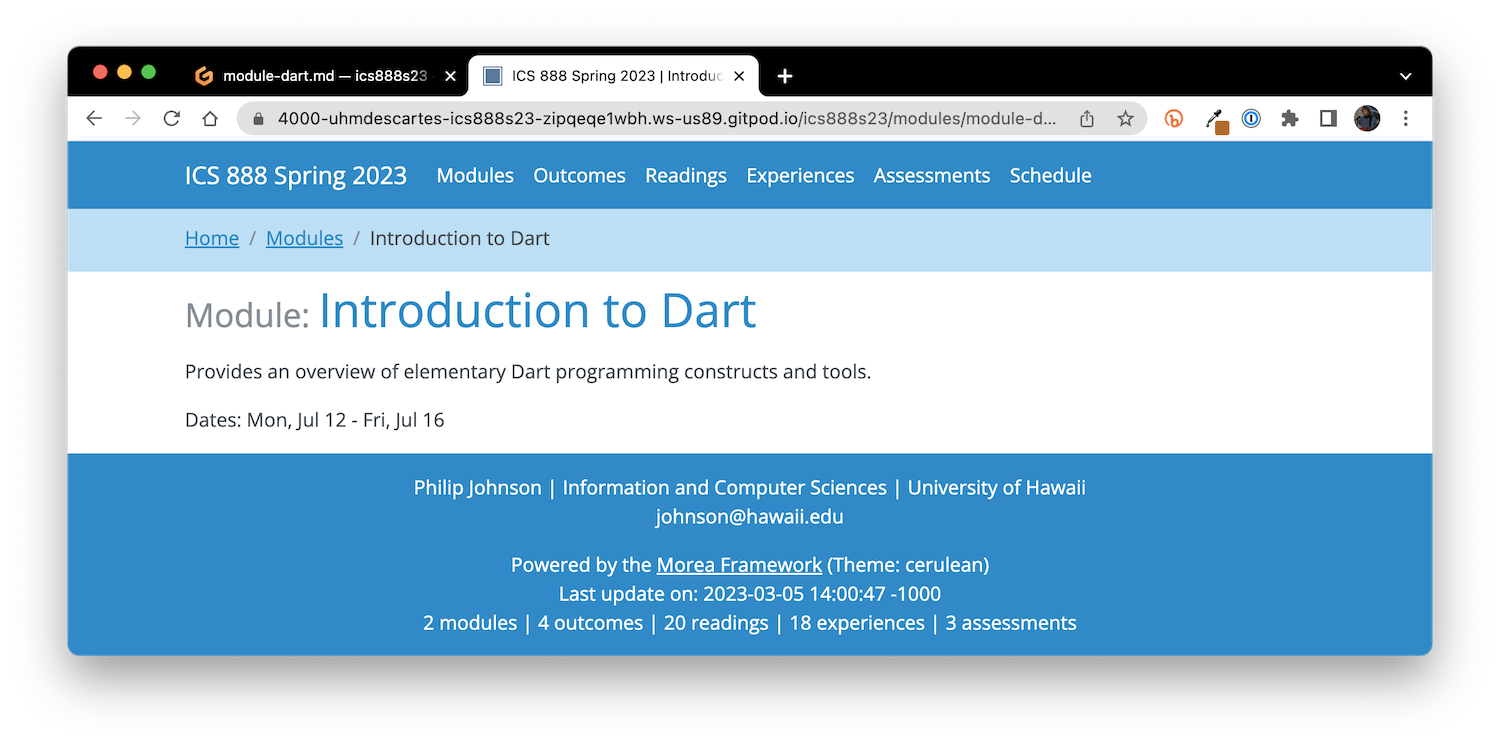
Let's fix that next.
Define outcomes
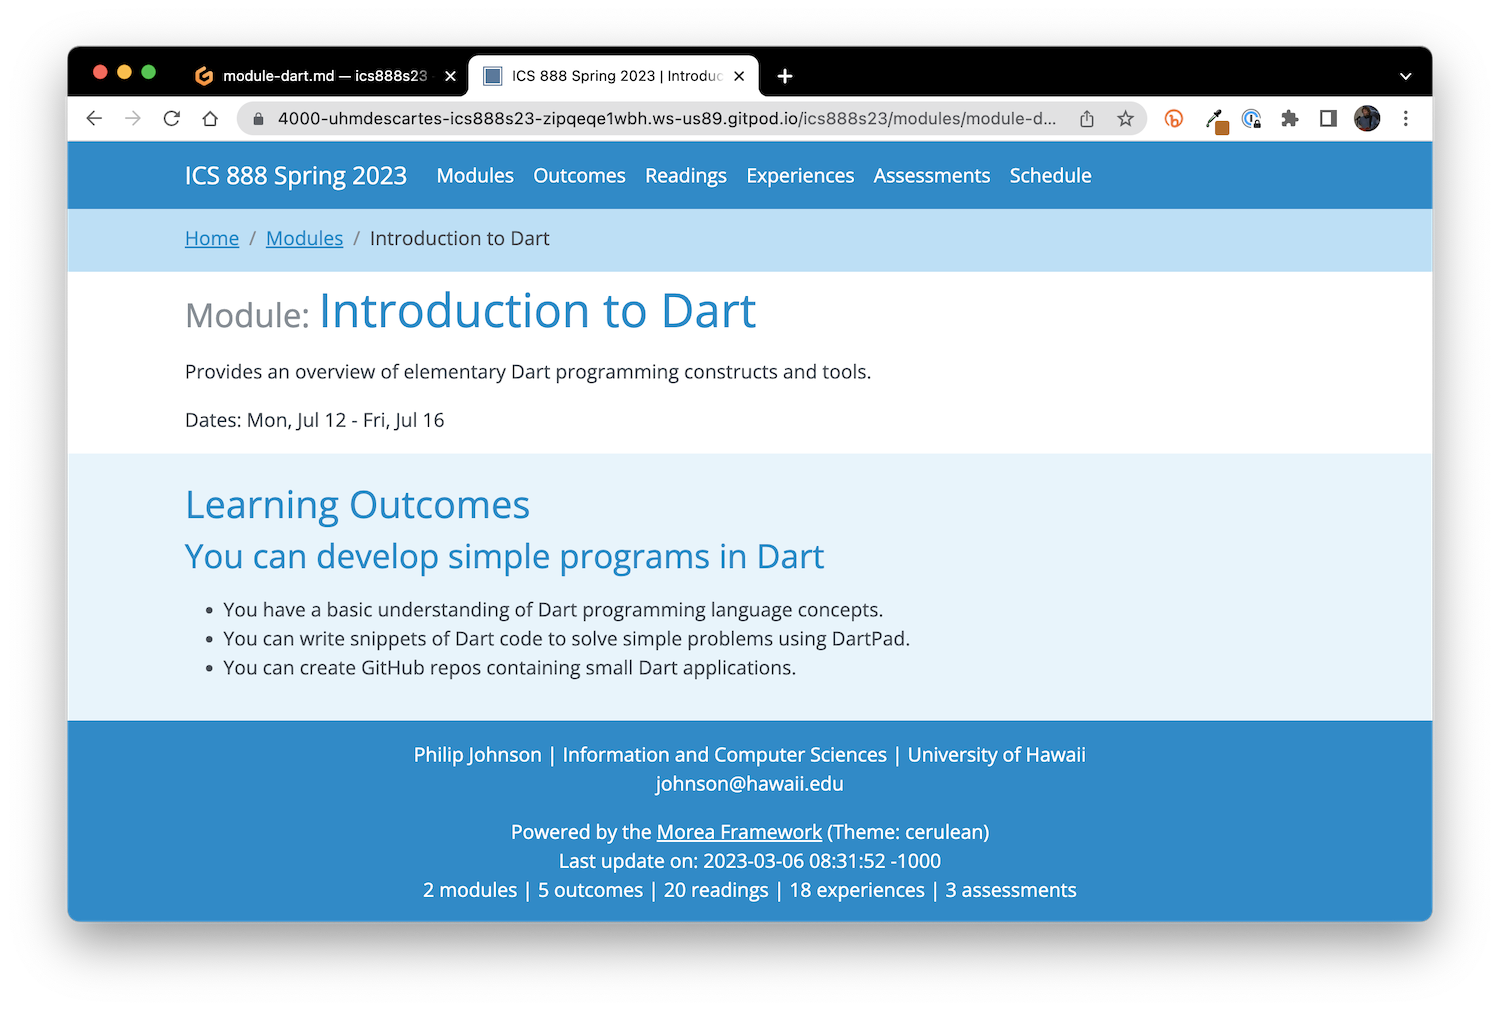
The Dart design document defines a single outcome. Here's what the outcome-dart.md file looks like after editing to conform to the design:
---
title: "You can develop simple programs in Dart"
published: true
morea_id: outcome-dart
morea_type: outcome
morea_sort_order: 7
---

* You have a basic understanding of Dart programming language concepts.
* You can write snippets of Dart code to solve simple problems using DartPad.
* You can create GitHub repos containing small Dart applications.
When writing outcomes, readings, experiences, and assessments, you'll use Markdown to format your code. If you're not familiar with Markdown, here are a few resources:
In addition, Morea provides some useful extensions. For example, see the Reference pages on equation support, formatting code, embedding video, icons, tables, and admonitions.
Next, we have to update the module-dart.md file to include this Morea entity by providing its morea_id in the morea_outcomes: section:
---
title: "Introduction to Dart"
published: true
morea_coming_soon: false
morea_id: module-dart
morea_prerequisites:
morea_outcomes:
- outcome-dart
morea_readings:
# - reading-CHANGE-ME
morea_experiences:
# - experience-CHANGE-ME
morea_assessments:
# - assessment-CHANGE-ME
morea_type: module
morea_icon_url: /morea/dart/dart.png
morea_start_date: "2021-07-12"
morea_end_date: "2021-07-16T23:00"
morea_labels:
morea_sort_order: 21
---
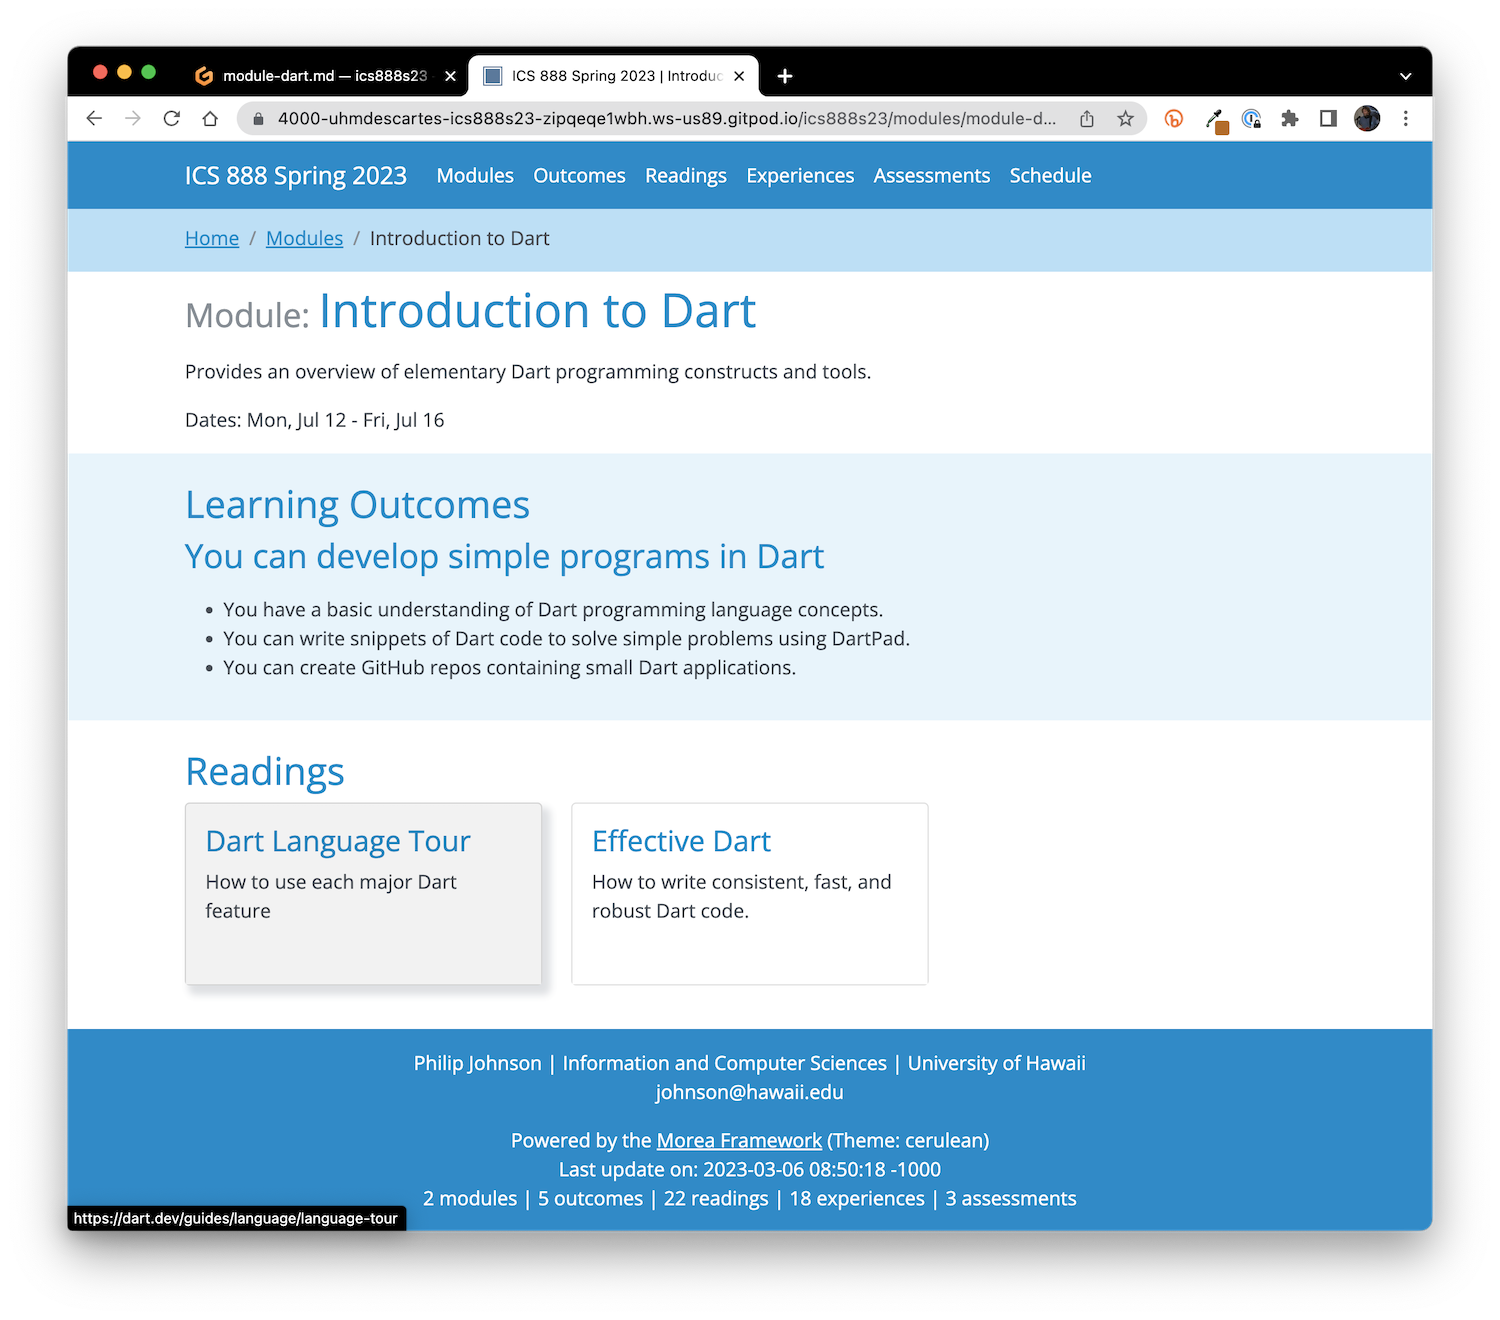
Provides an overview of elementary Dart programming constructs and tools.
Now control-c, control-p, and return to restart Jekyll. Refresh your browser window and the Dart module page should look like this:
Define readings
The Dart design document defines two readings. After updating, reading-dart-language-tour.md will look like this:
---
title: "Dart Language Tour"
published: true
morea_id: reading-dart-language-tour
morea_summary: "How to use each major Dart feature"
morea_url: https://dart.dev/guides/language/language-tour
morea_type: reading
morea_labels:
---
The reading-effective-dart.md file will look like this:
---
title: "Effective Dart"
published: true
morea_id: reading-effective-dart
morea_summary: "How to write consistent, fast, and robust Dart code."
morea_url: https://dart.dev/guides/language/effective-dart
morea_type: reading
morea_labels:
---
And after updating the module-dart.md file to include these two readings, it will look like this:
---
title: "Introduction to Dart"
published: true
morea_coming_soon: false
morea_id: module-dart
morea_prerequisites:
morea_outcomes:
  - outcome-dart
morea_readings:
  - reading-dart-language-tour
  - reading-effective-dart
morea_experiences:
  # - experience-CHANGE-ME
morea_assessments:
  # - assessment-CHANGE-ME
morea_type: module
morea_icon_url: /morea/dart/dart.png
morea_start_date: "2021-07-12"
morea_end_date: "2021-07-16T23:00"
morea_labels:
morea_sort_order: 21
---

Provides an overview of elementary Dart programming constructs and tools.
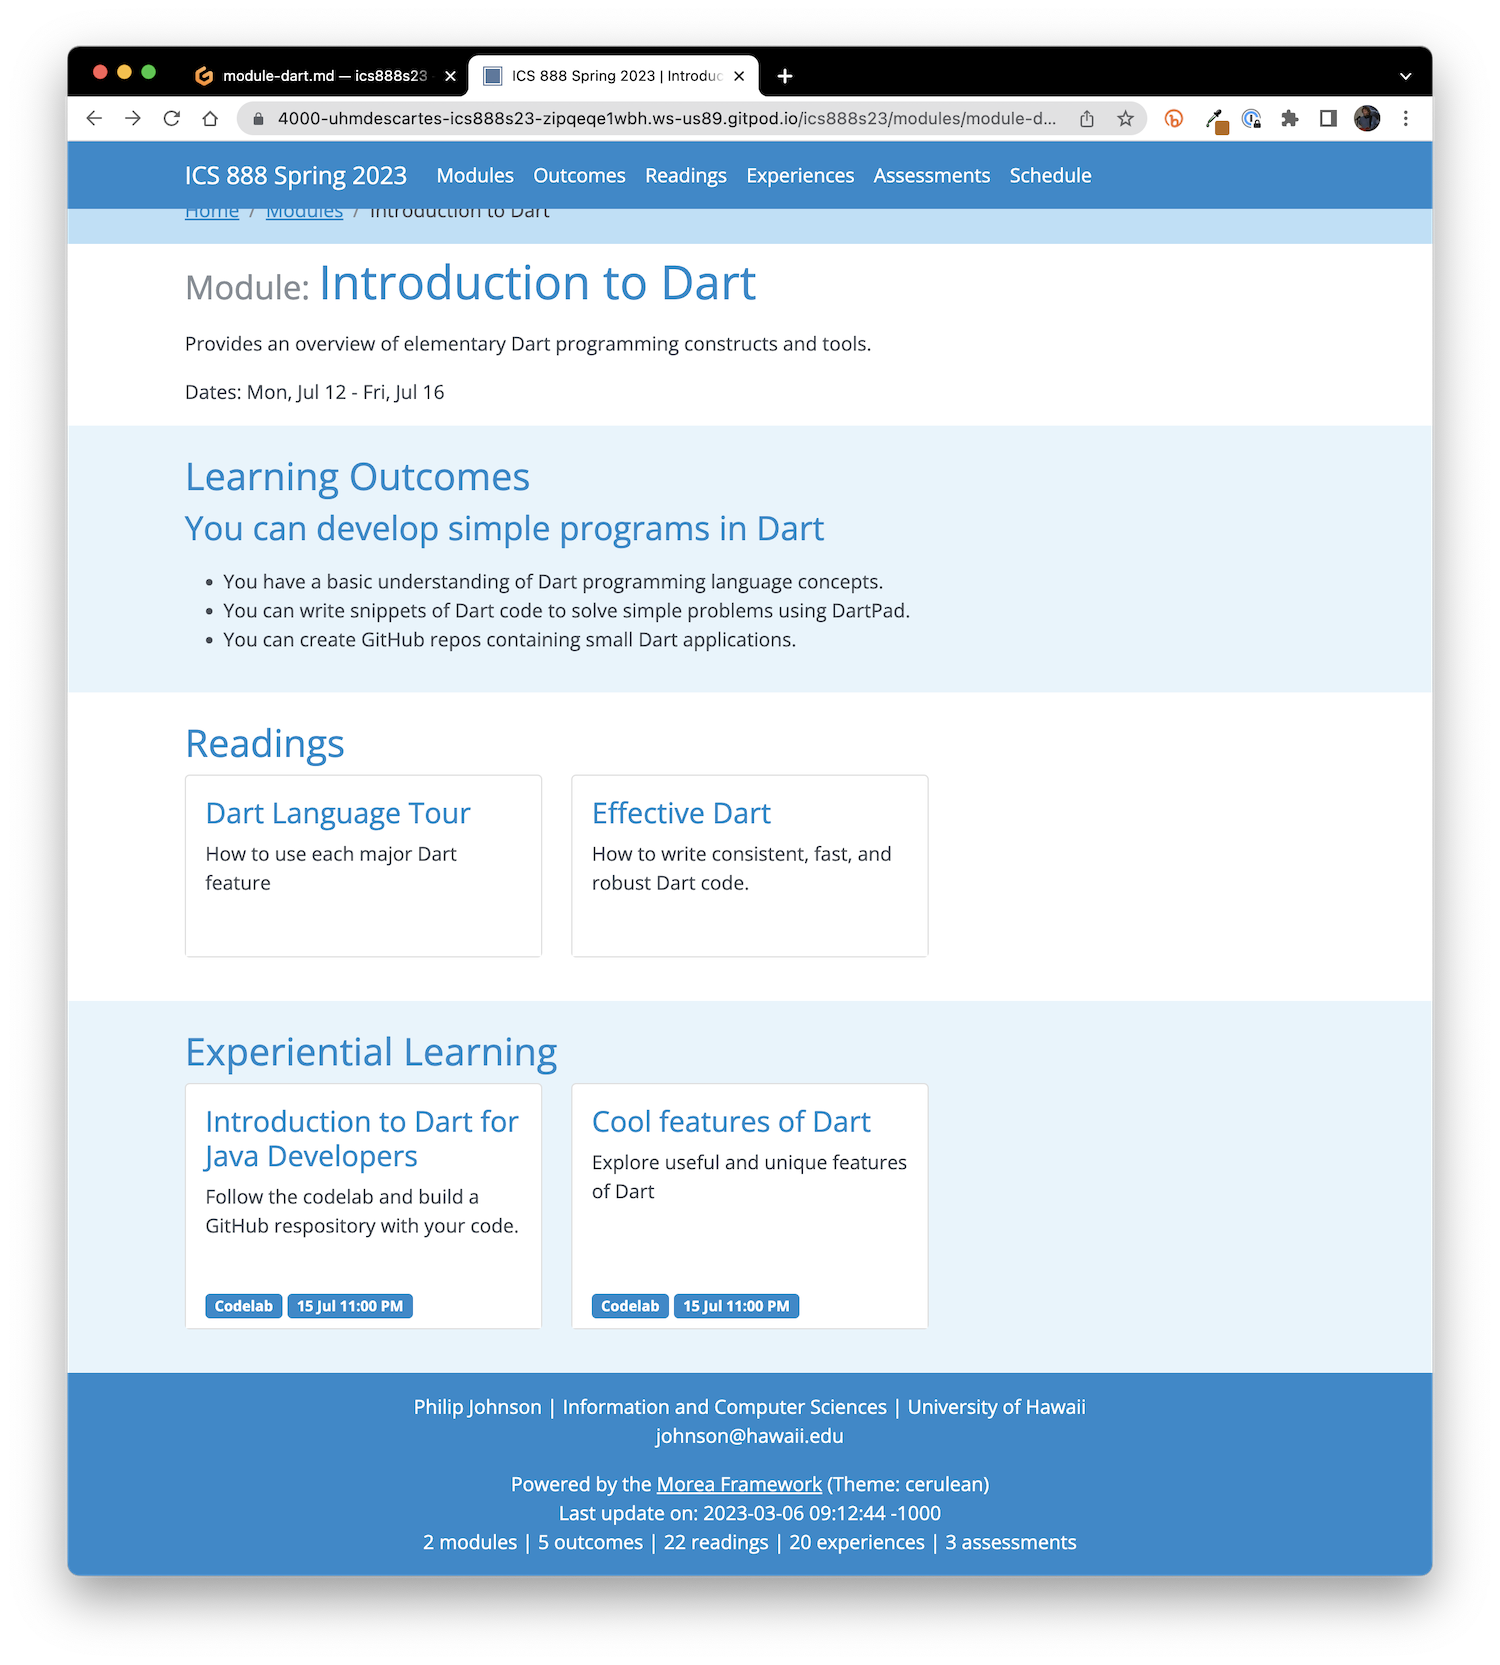
Let's control-c, control-p, and return to restart Jekyll, and voila:
As you can infer from the screenshot, clicking on the reading card takes you directly to the Dart documentation page.
Define experiences
The Dart design document defines two experiences. After updating, experience-dart-for-java-developers.md might look like this:
---
title: "Introduction to Dart for Java Developers"
published: true
morea_id: experience-dart-for-java-developers
morea_type: experience
morea_summary: "Follow the codelab and build a GitHub respository with your code."
morea_start_date: "2021-07-15T23:00"
morea_labels:
  - Codelab
---

# Introduction to Dart for Java Developers

For this experience, please go through the Intro to Dart for Java Developers codelab: <https://developers.google.com/codelabs/from-java-to-dart#0>

During the codelab, you should use the embedded DartPad environment to execute the examples.

Take your time, don’t rush, and make sure you understand every line of code and every sentence in this codelab! If you have questions or get stuck, post a message to our Discord server.

When you are done with the codelab, please do the following:
  * Create a private GitHub repository called “dart-scream”.
  * Clone it to your laptop.
  * Edit the scream application to produce the same output as Section 6 of this codelab
  * Commit your changes when finished.

## Submission instructions:
By the date and time associated with this assignment in Laulima, please submit the URL to your github repository.
The experience-dart-cool-features.md file might look like this:
---
title: "Cool features of Dart"
published: true
morea_id: experience-dart-cool-features
morea_type: experience
morea_summary: "Explore useful and unique features of Dart"
morea_start_date: "2021-07-15T23:00"
morea_labels:
  - Codelab
---

# Cool features of Dart

For this experience, please go through the Dart Cheatsheet codelab:
<https://dart.dev/codelabs/dart-cheatsheet>

This codelab introduces a lot of interesting language features, including:
  * ??= assignment, ?? operator, null-shorting cascade: ?.., initializer lists, redirecting constructor.

When you are done with the codelab, please do the following:
  * Create a private GitHub repository called “dart-recipe”.
  * Clone it to your laptop.
  * Run “dart create recipe” to create a template Dart application.
  * Edit the recipe application to include the (corrected) code from the bottom of the final section of this codelab (“Const constructors”).
  * Commit your changes when finished.

## Submission instructions:

By the date and time associated with this assignment in Laulima, please submit the URL to your github repository.
Update module-dart.md to include these two experiences:
---
title: "Introduction to Dart"
published: true
morea_coming_soon: false
morea_id: module-dart
morea_prerequisites:
morea_outcomes:
  - outcome-dart
morea_readings:
  - reading-dart-language-tour
  - reading-effective-dart
morea_experiences:
  - experience-dart-for-java-developers
  - experience-dart-cool-features
morea_assessments:
  # - assessment-CHANGE-ME
morea_type: module
morea_icon_url: /morea/dart/dart.png
morea_start_date: "2021-07-12"
morea_end_date: "2021-07-16T23:00"
morea_labels:
morea_sort_order: 21
---

Provides an overview of elementary Dart programming constructs and tools.
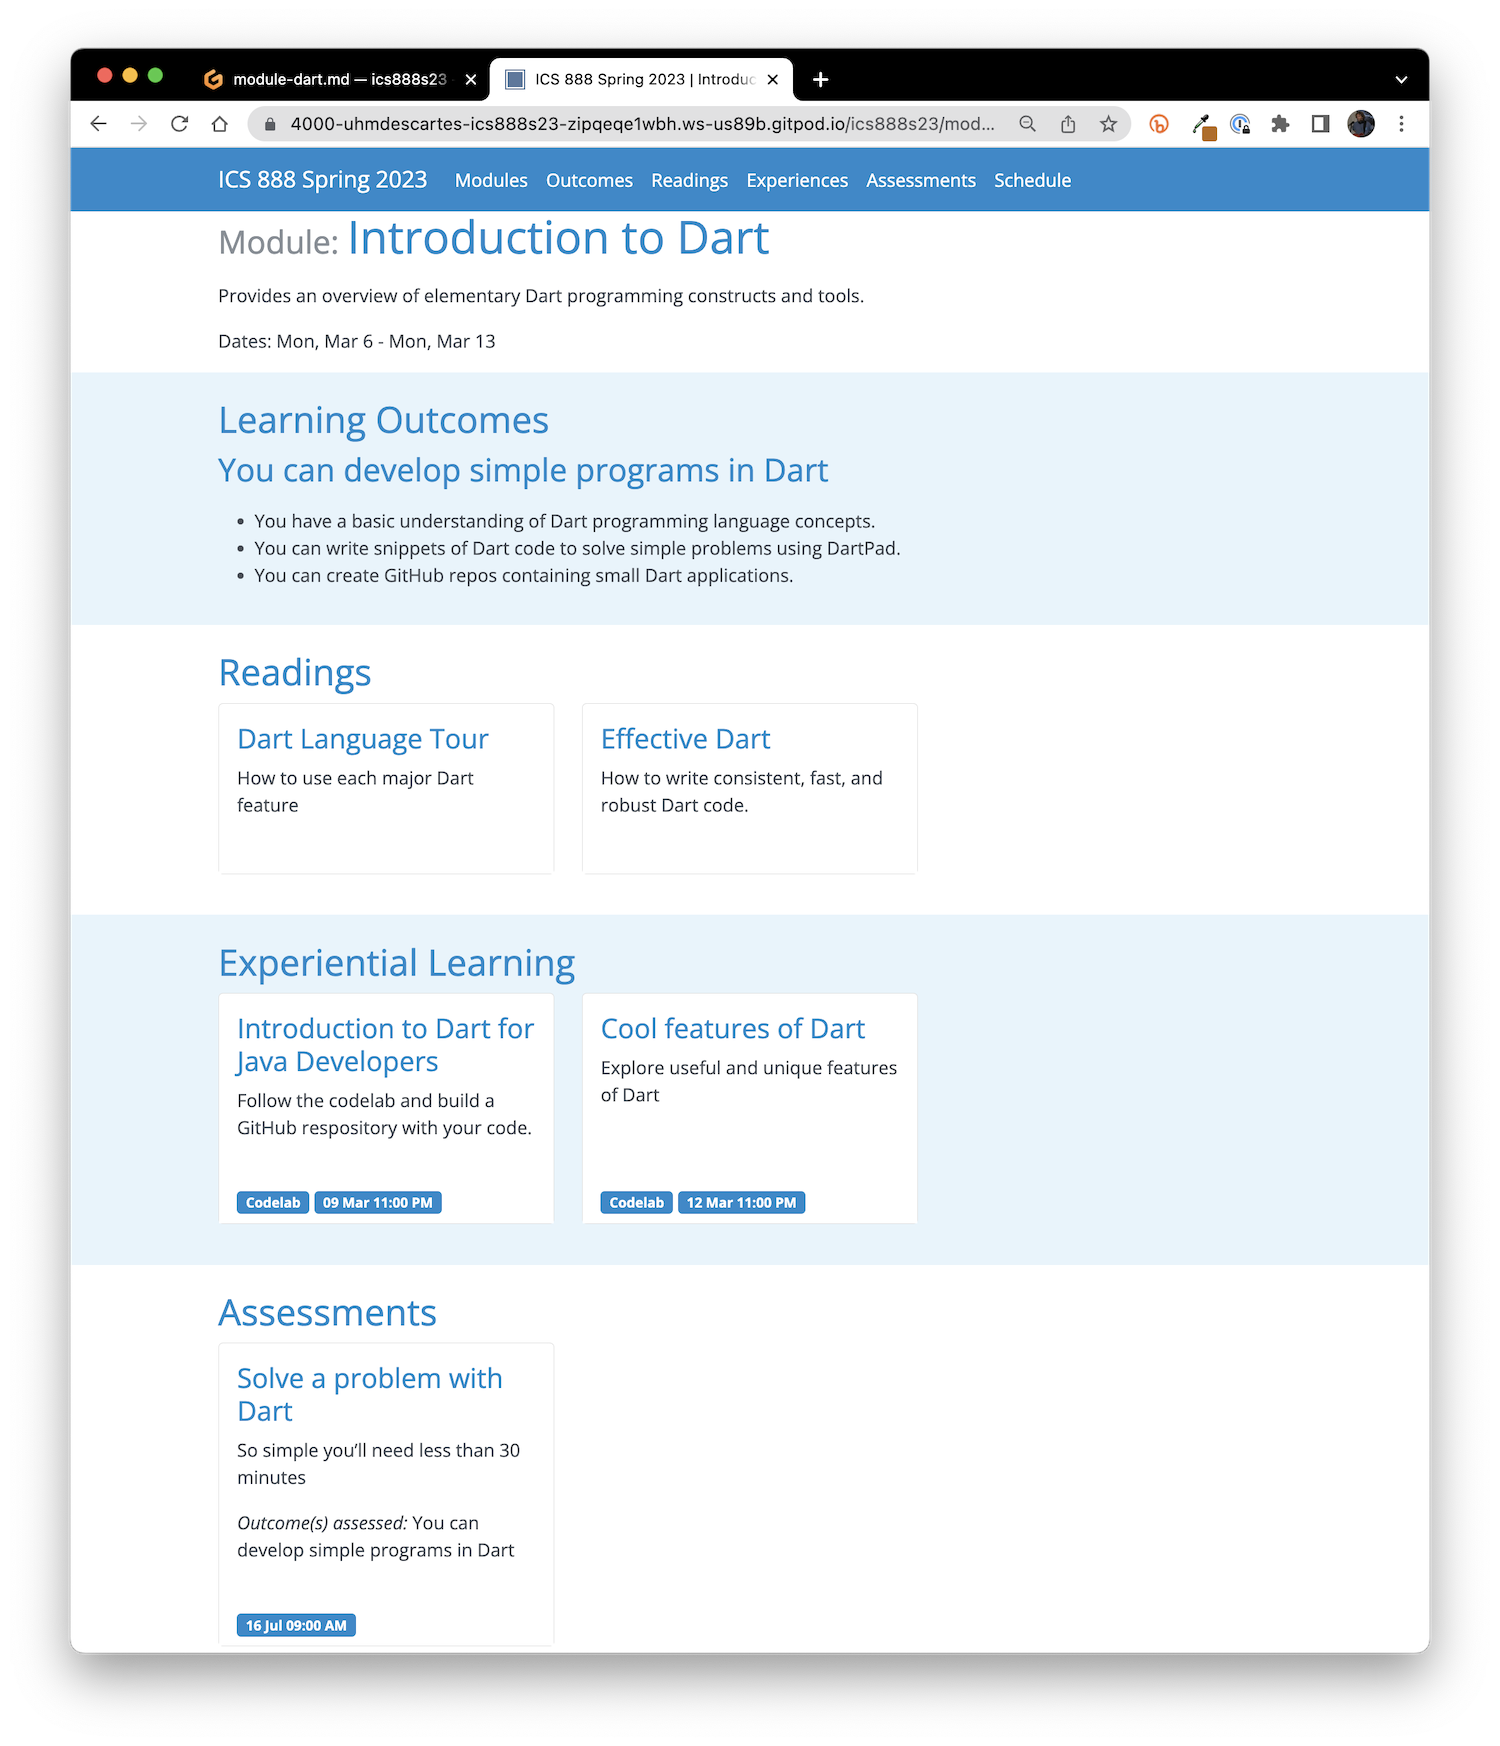
Now the module is really coming together:
Define assessments
The Dart design document defines one assessment. After updating, assessment-dart.md might look like this:
---
title: "Solve a problem with Dart"
published: true
morea_id: assessment-dart
morea_summary: "So simple you'll need less than 30 minutes"
morea_outcomes_assessed:
 - outcome-dart
morea_type: assessment
morea_labels:
morea_start_date: "2021-07-16T09:00"
morea_sort_order: 2
---

# Solve a problem with Dart

For this assessment, you will be given a problem to solve using Dart within 30 minutes in class.

It will require you to:
* Have the Dart SDK, GitHub Desktop, and IntelliJ installed on your laptop.
* Create a GitHub repo.
* Use DartPad and the Dart programming language to solve a problem.

You must work alone, but you can use any non-human Internet resources (Google, ChatGPT, etc.)

The actual problem, and submission instructions, will be provided in-class on the day of this assessment.
Update module-dart.md to include this assessment:
---
title: "Introduction to Dart"
published: true
morea_coming_soon: false
morea_id: module-dart
morea_prerequisites:
morea_outcomes:
  - outcome-dart
morea_readings:
  - reading-dart-language-tour
  - reading-effective-dart
morea_experiences:
  - experience-dart-for-java-developers
  - experience-dart-cool-features
morea_assessments:
  - assessment-dart
morea_type: module
morea_icon_url: /morea/dart/dart.png
morea_start_date: "2023-03-06"
morea_end_date: "2023-03-13"
morea_labels:
morea_sort_order: 21
---

Provides an overview of elementary Dart programming constructs and tools.
And the module structure is complete:
Define the module schedule
You may have noticed some dates associated with modules, experiences, and assessments. Also, the "Schedule" page appears to be empty. Let's fix that now.
Edit schedule/index.html
First, open the schedule/index.html page. It looks like this:
---
layout: default
title: Schedule
---
{% include breadcrumb-2.html %}

<!--
  Load FullCalendar for schedule page.
  Documentation available at: http://fullcalendar.io/

  Things to do to configure your Schedule page:
  (1) Edit the holidayData variable to include holidays appropriate for this semester.
  (2) Delete the initialDate field in the FullCalendar constructor so that the calendar automatically
      displays the current month.
-->

<link rel="stylesheet" href="//cdn.jsdelivr.net/npm/fullcalendar@5.8.0/main.min.css">
<script src="//cdn.jsdelivr.net/npm/fullcalendar@5.8.0/main.min.js"></script>

<!-- This script defines the moreaEventData variable containing an array of events from Morea pages. -->
<script src="schedule-info.js"></script>

<script>
  var holidayData = {color: 'green',
    events: [
      {title: "Classes start", start: "2021-07-06"},
      {title: "Holiday: Independence Day (Observed)", start: "2021-07-05"},
      {title: "Classes end", start: "2021-07-30"},
    ]};
</script>

<div style="margin-bottom: 10px" class="container">
  <h1>Schedule</h1>
  <div id='calendar'></div>
</div>

<script>
  document.addEventListener('DOMContentLoaded', function() {
    var calendarEl = document.getElementById('calendar');
    var calendar = new FullCalendar.Calendar(calendarEl, {
      initialView: 'dayGridMonth',
      eventColor: '#446e9b',
      initialDate: '2021-07-01',
      eventSources: [{events: moreaEventData}, holidayData]
    });
    calendar.render();
  });
</script>
The comment at the top indicates two things you usually want to do to set up the schedule page:
- Edit the holidayData variable to include holidays appropriate for this semester.
- Delete the initialDate field in the FullCalendar constructor so that the calendar automatically displays the current month.
We won't deal with the holidayData variable for this tutorial, but definitely delete the initialDate so that the calendar displays the current month.
Edit module start and end dates
Now edit the morea_start_date: and morea_end_date: fields in module-dart.md. The Dart design document said this module was a week long, but did not indicate exactly which week. Go ahead and edit these fields so that the module lasts for one week during the current month, starting on Tuesday and ending on the following Monday. For example:
morea_start_date: "2023-03-07"
morea_end_date: "2023-03-14"
Do a control-c, control-p, return and refresh the Schedule page to see if the module is now listed for the current month.
Edit experience and assessment due dates
Let's now edit the morea_start_date: fields associated with our experiences and assessments. These dates (and times) will indicate the "due date" associated with the experience.
Our design document said that the Intro to Dart for Java Developers experience was due on Day 4, the Cool Features of Dart experience was due on Day 6, and assessment was due on Day 7 (in class). Let's update the fields appropriately.
When you're all finished, do a control-c, control-p, return and refresh the Schedule page. It should look something like this:
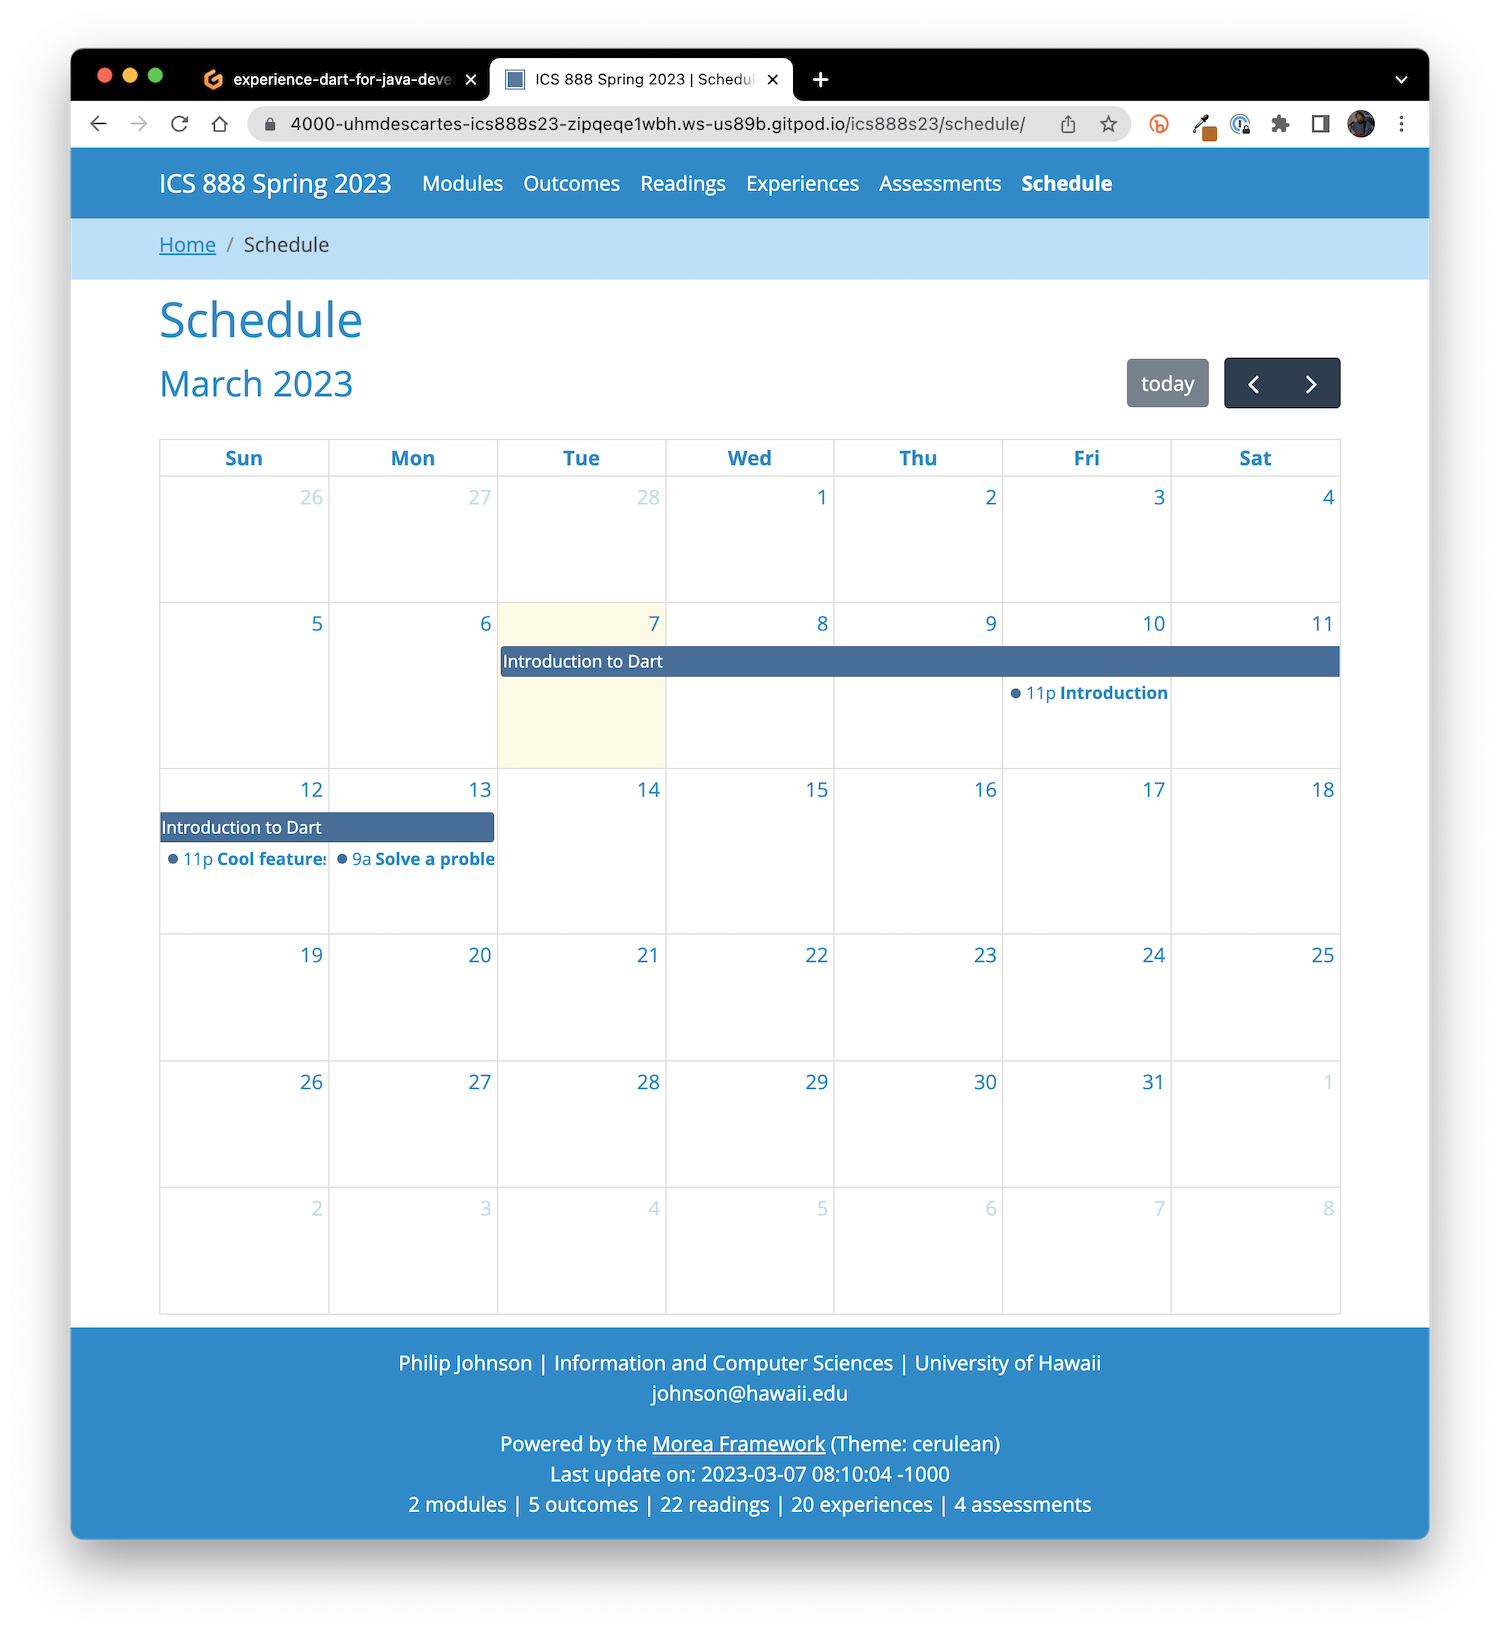
Notice that all of the schedule entries are clickable URLs: the module entry takes you to the module page, and the experience and assessment entries take you to their pages as well.
Commit, push, and publish
Our module is looking pretty good, so let's publish our changes.
If you are doing local development, you will use GitHub Desktop (or your favorite local git client) rather than using the facilities inside VS Code for the Browser.
First, click on the "Source Control" icon in the left sidebar (it should have a badge listing a dozen or so changes). You will see a list of files, so marked with an "M" indicating that they've been modified, and some marked with a "U", indicating that they are "untracked" by git.
Second, we want all files to be tracked, so click on the "..." at the top of the pane, select "Changes", and then select "Stage All Changes". After you do this, all the "U" marks will change to "A", indicating that the files are marked for "adding" to the repo. That's good.
Third, enter a commit message, such as "Publish dart module", pull down the "Commit" menu button bar, and select "Commit and Push". This will commit the changes to the local repo at Gitpod, and push those changes to your repository at GitHub.
Fourth, visit your repo on GitHub. You should see, just above the code directory, the commit message you just entered indicating that the commit was received at GitHub:
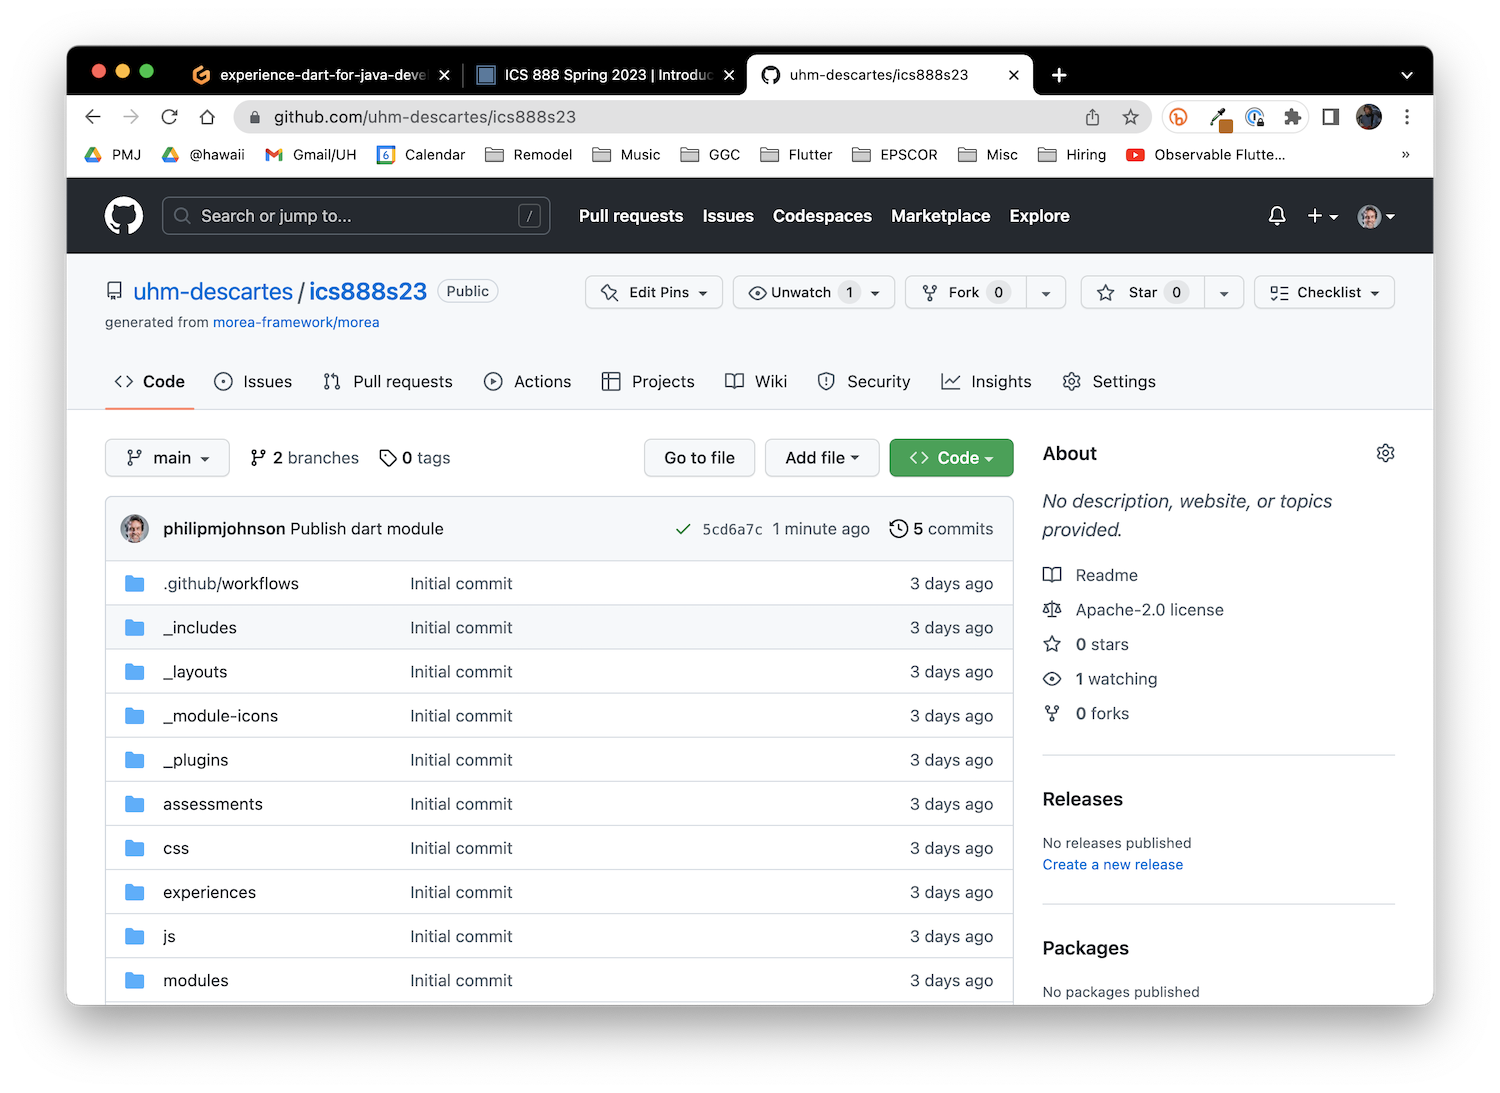
Furthermore, if you click on the "Actions" tab, you will see that GitHub is now rebuilding and republishing your site.
Finally, once GitHub has finished rebuilding the site, click on the URL to see the published and publicly available version of your site:
Additional edits
Just FYI, there remains a few additional edits to make this site your own:
home.md. Edit this file to change the content appearing on your home page.footer.md. Edit this file to change the content appearing in the footer of all pages.introduction/. You probably want an Introduction module, but you probably want to change its contents.morea/prerequisites. If you want to define prerequisite modules for any of our modules, use the file in this directory as an example.morea_sort_order:. As the number of modules and outcomes grow, you should adjust themorea_sort_order:field in the front matter associated with each module and outcome file so that the modules and outcomes appear in an appropriate order in their respective index pages.